Getting you started quickly
This section will give you a quick overview over Photo Deduplicator's user interface and how to get you going with renaming your photo files.
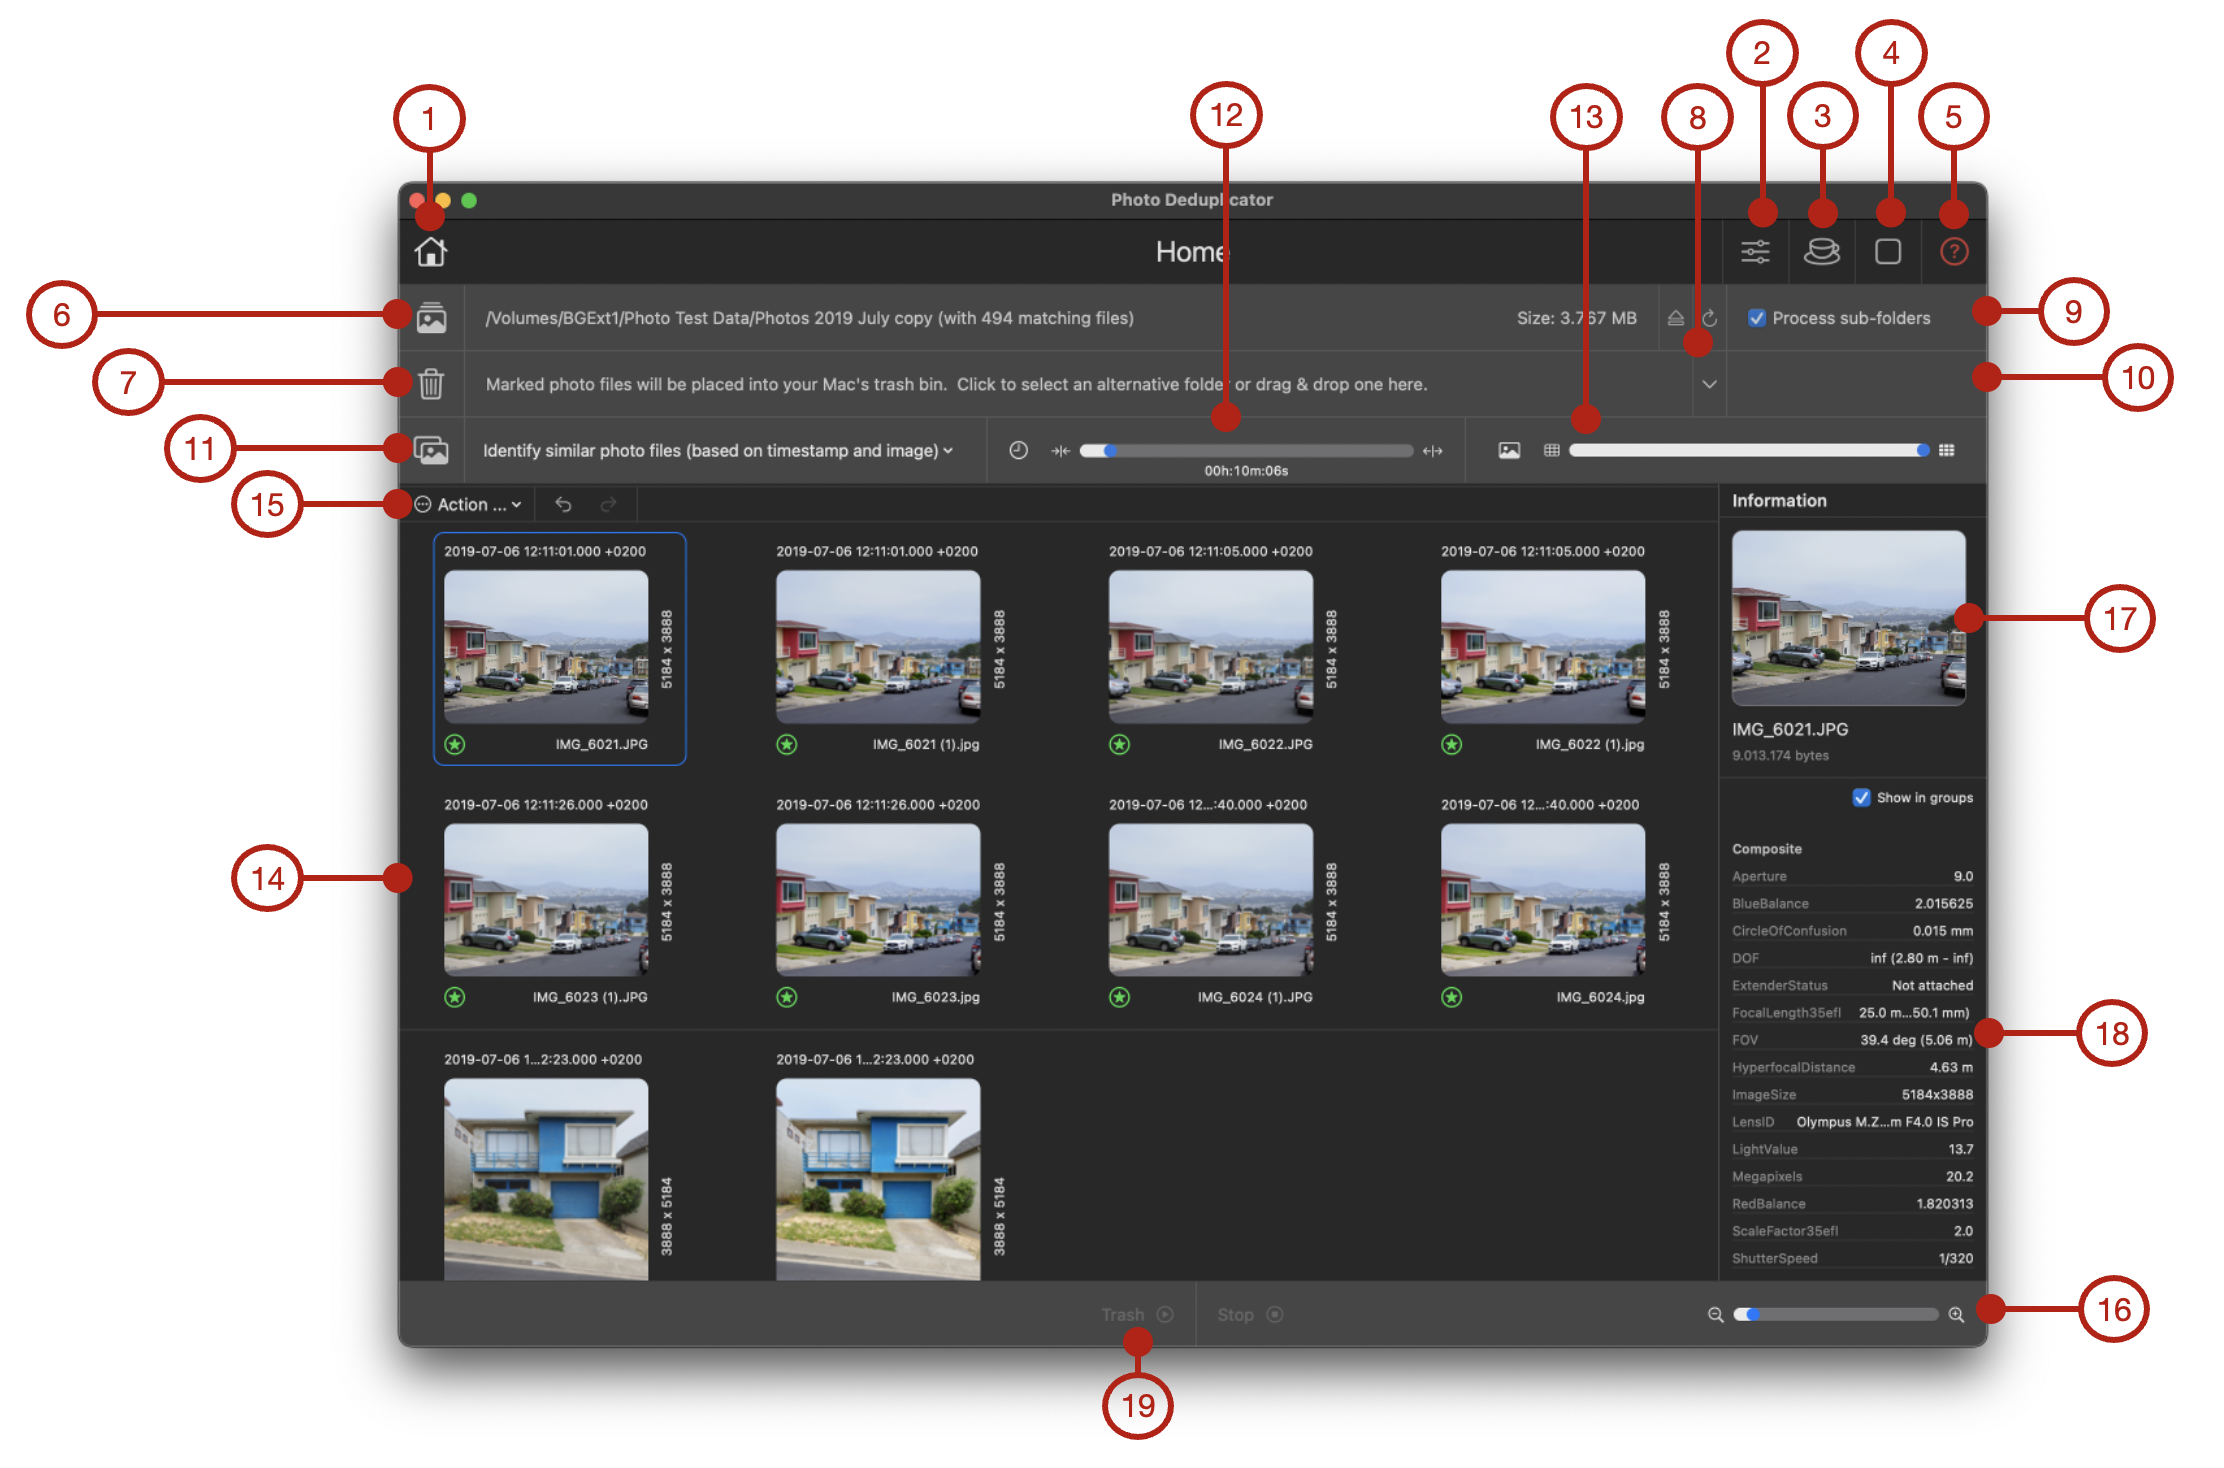
- Home button: The home button on the navigation bar of Photo Deduplicator gets you to the main or home sheet. Here you can select which photo files you want to process, where to put the trashed or moved files in your file system, or define how to group them based on similarity.
- Settings button: The Settings button on the navigation bar opens the Settings sheet. There you can customize some of the behavior of Photo Deduplicator. See Settings for more details on settings.
- Coffee Donation button: Gets you to the Coffee Donation section where you make a coffee donation to the author of Photo Deduplicator in case you like the app and feel about supporting the development and maintenance of it. No worries – all just a voluntary, one time donation of course.
- About button: Gets you to the About section where you find links to product support, latest version information, release notes and other relevant information.
- Help button: The help button on the navigation bar gets you to this documentation on Photo Duplicator's support website.
- Input Files/Folders: First step is always to select a folder or individual files within a folder that you want to use as input to the procedure. You can either click this button or you can drag & drop files or folders (preferably!) here from Finder or your Mac's desktop. Once you have made your selection, Photo Deduplicator will start scanning all files – and if recursive processing of folders is enabled in the settings of Photo Deduplicator also the sub-folders within the folder you provided as input –, read their metadata and once finished show all photo files found in the area below (14).
- Trash Bin or Output Folder: You can place marked photo files either into your Mac's trash bin or into a selectable output folder instead. Here you can select where the marked photo files will go. Not defining (or ejecting/removing) an output folder implicitely sets the trash bin as target.
- Reset/Eject buttons: Press to reset ('cross' icon) the currently set input or output folder, or – if those folders are located on an external device like a USB stick or SD card – eject ('eject' icon) the respective device.
- Process sub-folders: If this option is selected, Photo Deduplicator will recursively process the input folder as well as all its sub-folders (and those within). If this option is disabled, only the files in the currently selected folder will be processed.
- Re-create sub-folders: If you select this option and have Process sub-folders enabled as well, Photo Deduplicator will re-create the sub-folders found in the input folder in the exact same structure within the output folder. This allows you to move files stored in arbitrary sub-folder structures and maintaining this structure when moving individually marked files. If this option is disabled, Photo Deduplicator will move or copy the input files 'flat' into the output folder. This option is only effective if you don't trash marked files into the trash bin of your Mac.
- Grouping criteria: To allow you to easily select which photo files you want to remove, Photo Deduplicator groups them based on certain criteria. There are three kinds of grouping criteria supported:
- Group identical photo files: Identical photo files means photo files that are byte-wise identical, i.e. exact copies of each other.
- Group related photo files based on timestamps: Here photo files which have a timestamp that is not further apart than a selectable threshold are grouped together. This option allows you to easily group photo files that were all taken within a certain time window, e.g., an hour.
- Group similar photo files based on timestamps and image content: This option finally compares photo taken within a certain time window and which have content that is not necessarily identical, but sufficiently similar (e.g. several similar portraits taken of a person with slighthly different perspective or facial expression). You can to some extent determine the level of similarity required for photos to be grouped together.
Caveat: Determining whether two photos are similar is not a straightforward task and the algorithm applied allows for a fair amount of error. Before trashing photo files ensure that you have double-checked what you selected!
- Timespan selector: When grouping related or similar files, this selector allows you to define the maximum time two photos' creation timestamps can be apart to be considered related or similar.
- Similarity selector: When grouping similar files, this selector allows you to define the level of similarity required for two photos' to be considered similar.
- Photo Files viewer: Once the scanning of the input files/folders is completed, all photo files will be displayed in this section, grouped by the selected grouping criteria. Each group gets a new sub-section separated by a horizontal line from the other adjacent groups. If more photos belong into a single group as can be displayed in one row, the row gets automatically wrapped to the next line.
Clicking a photo: If you click a photo, it will get selected and detailed information about the photo file will be displayed in the Info section to the right (18). Clicking a selected photo again will deselct it and hide the info section again.
Double-clicking a photo: If you double-click a photo, the default viewer application for the associated file type will be opened (by default this is the Preview app).
Clicking the green, circled star or the red, circled trash-bin: By clicking the little green or red icon in the bottom left corner below a photo will unmark or mark the photo for trashing/moving.
- Action ... menu: Hovering the mouse pointer over a group of photo files will reveal the action menu right above the group. The action menu contains buttons to undo or redo the last marker operation performed or provide you with a list of options to quickly select several photos across all groups at once or just those photos within the current group based on their timestamp or size.
- Zoom selector: Here you can define the zoom factor used to display the photos.
- Photo: If you select a photo in the Photo Files viewer (14), the respective photo will be displayed in the Info section. Double-clicking the photo will open the default application associated with this media type (e.g. Apple's Preview app or a photo application).
- Info section: The photo's metadata properties will be displayed with their values once a photo gets selected.
- Trash/Move (#n photos marked): Once you have marked at least one photo for trashing/moving, this button will get enabled. Be careful what you are doing -- once photo files got deleted, they can't be retrieved again.
As a general word of advise: When trashing photo files, make sure to keep some copies somewhere – ideally you have a recent backup of those files. Once deleted, photo files can't be retrieved anymore (as holds true for all deleted files).