This section will give you a quick overview over Photo Date Adjustator's user interface and how to get you going with your photo and video files.
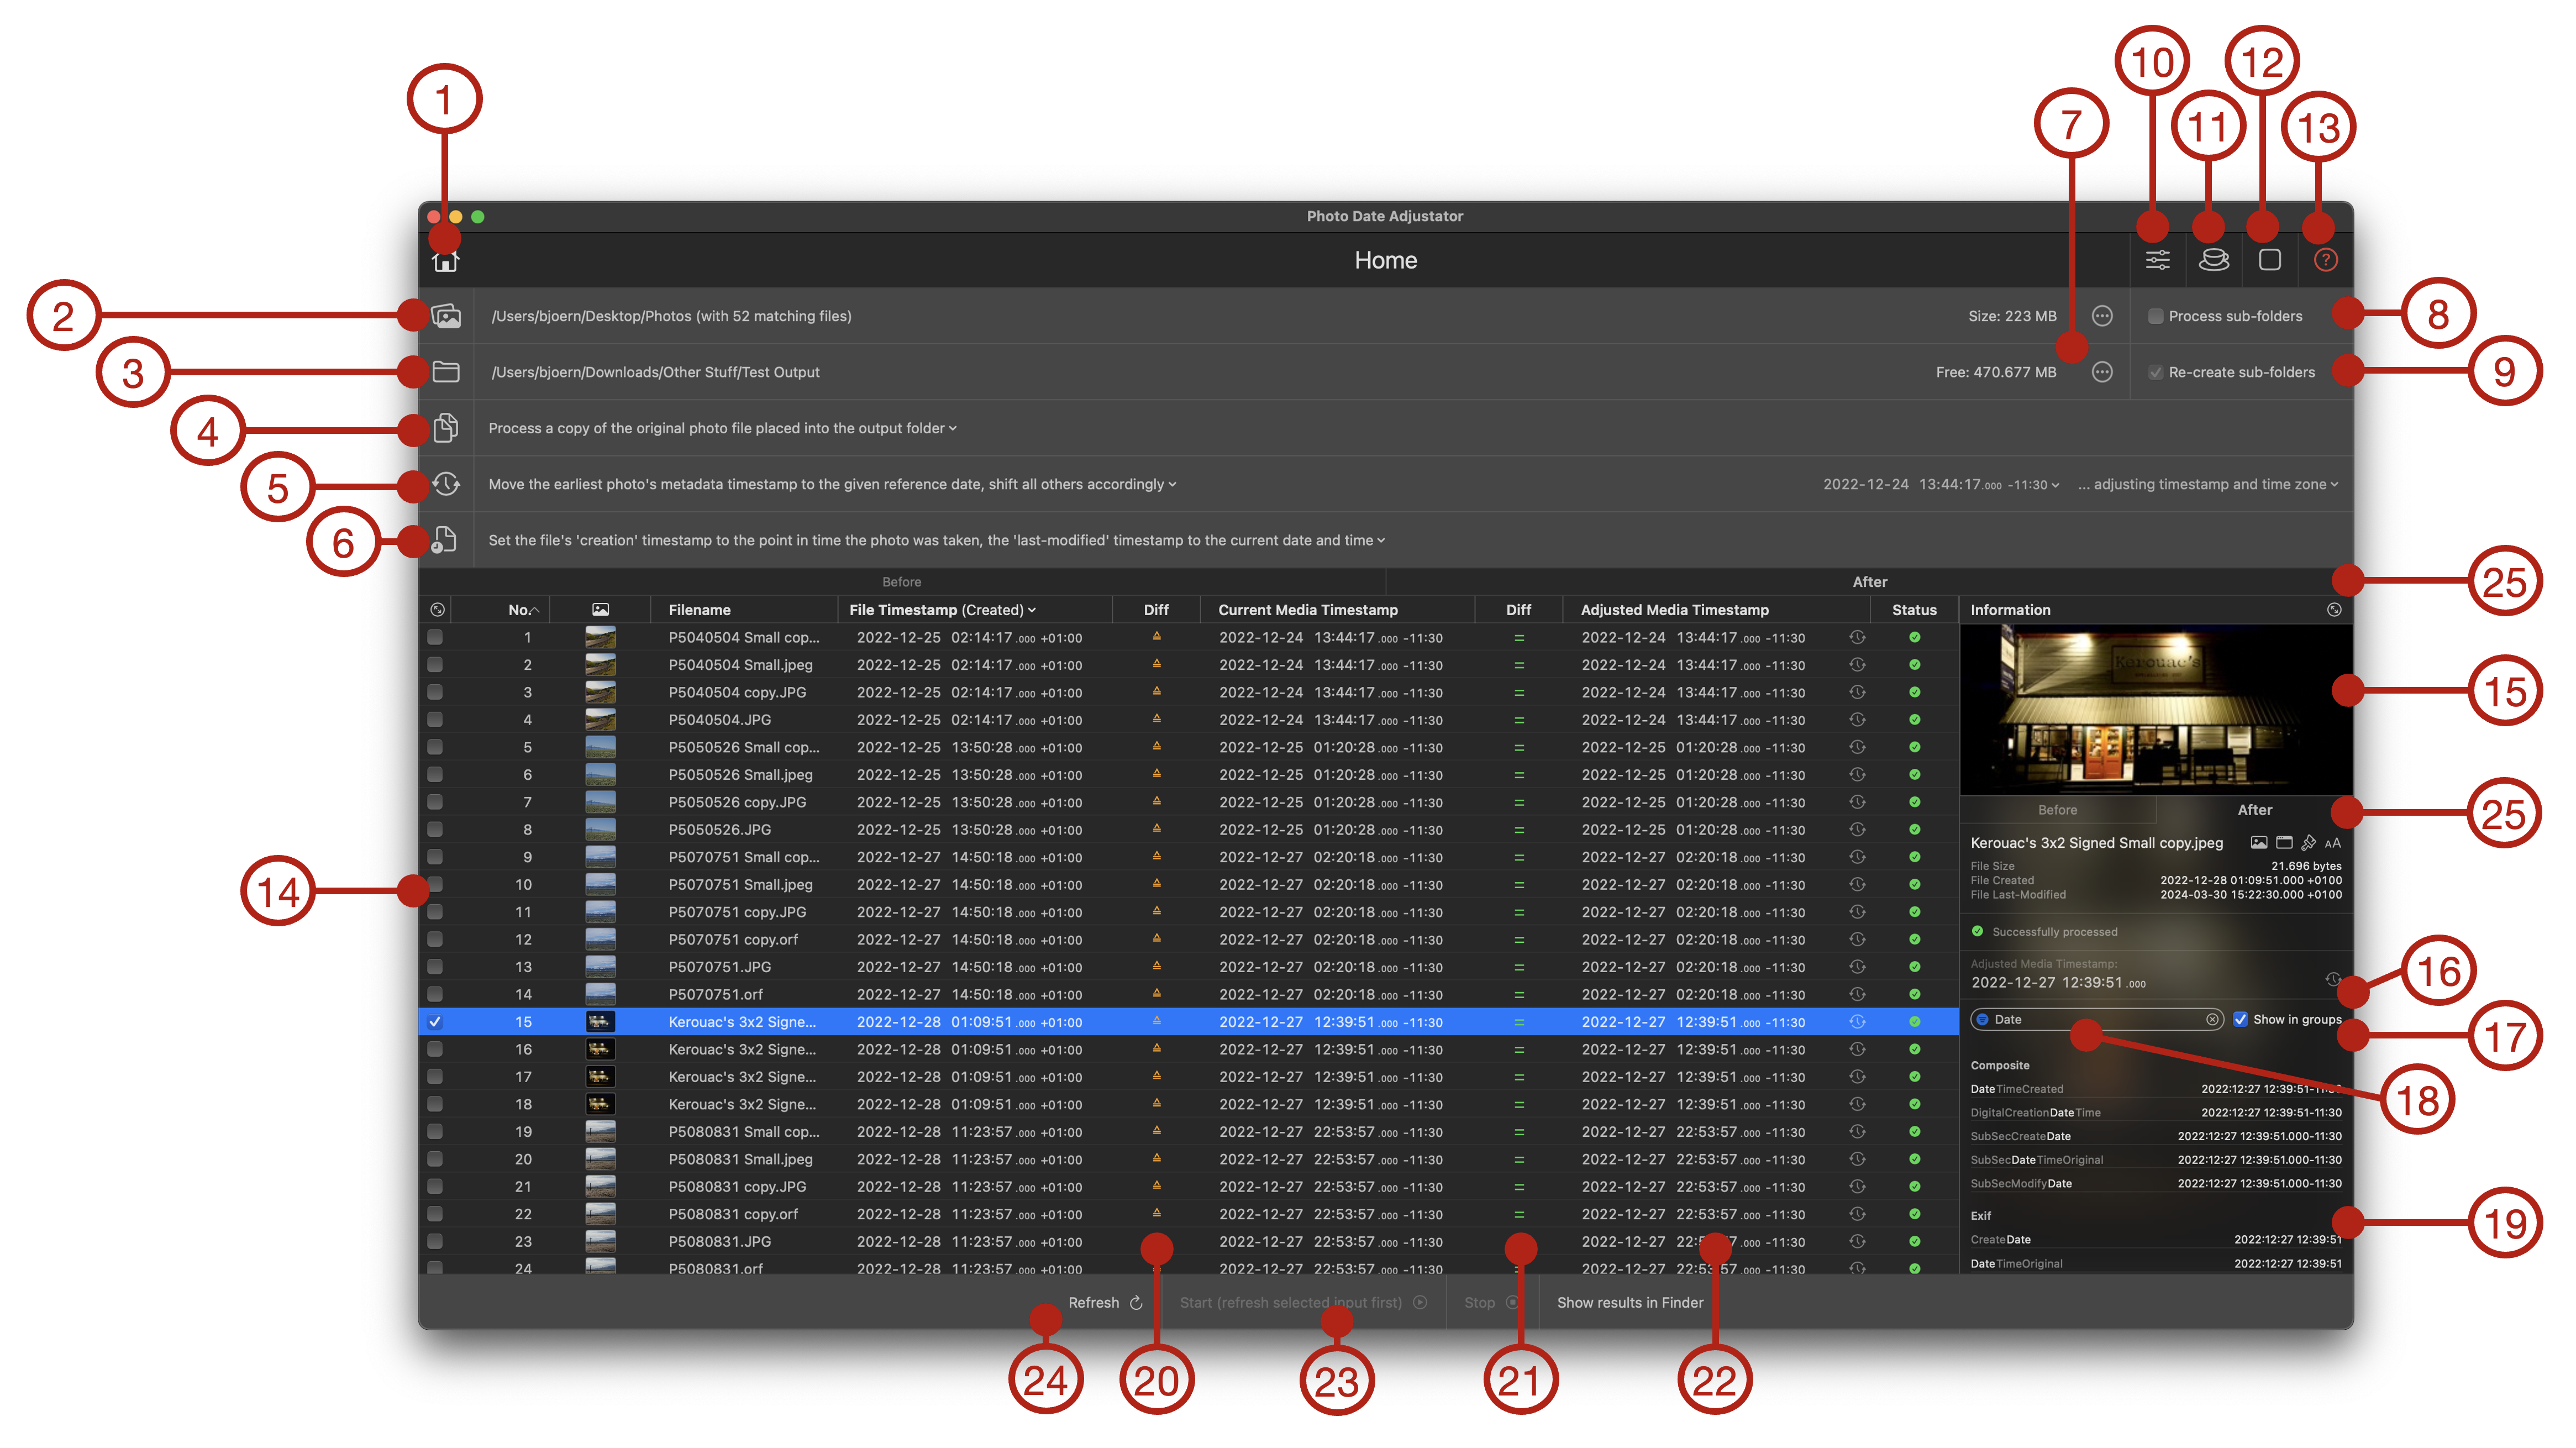
- Navigation Bar: At the top you'll find the Navigation Bar which allows you to switch between the Home section - the main section of the app –, the Settings section, the Coffee Jar section, the About section and the Help section. Click on the respective icons to switch back and forth.
- Settings section: The Settings section allows you to change a few options that influence the general behaviour of Photo Date Adjustator. Everything important that you need to control the adjustment of timestamps of your input files is conveniently located on the Home section directly, though.
- Coffee Jar section: At the Coffee Jar section you might make a coffee donation to the author of Photo Date Adjustator in case you like the app and feel about supporting the development and maintenance of it. No worries – all just a voluntary, one time donation of course.
- About section: The About section is the place to find links to product support, latest version information, release notes and other relevant information about Photo Date Adjustator.
- Help section: Not really a separate section, but conveniently opens your Mac's default browser loading the documentation from this Web site that you are currently reading.
- Input Files/Folders: First step is always to select a folder or individual files within a folder that you want to use as input to the adjustment procedure. You can either click this button or you can drag & drop files or folders here from Finder or your Mac's desktop. Once you have made your selection here, Photo Date Adjustator will start scanning all files – and if recursive processing of folders is enabled in Photo Date Adjustator (see #10) also the sub-folders within the folder you provided as input –, read their metadata and once finished list all photo files found in the table below (see #20).
Caveat: If you want to process several hundred or thousands of input files, please read Sandboxing and Processing Many Files first!
- Output Folder: Second step is always to provide an output folder where Photo Date Adjustator will move or copy the processed photo and video files, except if you have selected to process the original files. To avoid accidental mishaps, I recommend working on copies and storing them in a separate folder: Once you have achieved the desired result, you can still replace your original input files with their modified copies.
By default, Photo Date Adjustator will create a backup of every original file overwritten and store it in your Mac's trash bin for recovery if needed. Please refer to the Setttings section for more details.
- Input/Output menus: Both for the Input Files/Folder as well as the Output Folder pickers there's a dedicated context menu containing a list of recent files and folders selected in prior runs, an option to set or unset the current selection, etc.
- Process originals / copies: With this option you decide whether Photo Date Adjustator will modify the metadata of your original photo files or whether it will create copies of those files and modify the copies. I recommend to process copies – once the metadata of your original files has been adjusted, there is no turning back.
- Process this folder only / Process sub-folders too: With this option you decide whether Photo Date Adjustator will only process photo files in the input folder you selected, or recursively process the input folder as well as all its sub-folders (and those within).
- Store flat in folder / Recreate sub-folders: If you are processing input folders recursively (see #10), this option will be enabled and you can choose between storing the processed files "flat", i.e. ignoring their prior sub-folder location, in the output folder or whether the respective sub-folders are re-created in the output folder and the processed copies are stored in their respective (new) sub-folder.
- If file exists, keep both / overwrite / skip / ask me: If during processing of photo files, Photo Date Adjustator would overwrite an existing file in an output location due to the same name, you can define what default behaviour you want to be executed. "Ask" will always bring up a popup dialog and ask for your decision with each individual collision, "skip" will skip the processing of the current file (i.e. the existing one pertains), "overwrite" will replace the existing file with the newly processed photo file and "keep both" will result in the processed file getting a sequence number appended to its file name so that the collision with the existing file is resolved (and both files are kept). It is important to understand that this only applies if you process a set of photo files for the first time after loading them into Photo Date Adjustator: As of v4.00 Photo Date Adjustator supports repeated processing of photo files, i.e. you can make adjustements without reloading input files first and store those changes repeatedly – once an output file has been created for an input file, this same output file will be adjusted with every additional processing cycle (i.e. the previous output file will be overwritten). Also, if you are processing the original input files (see #9), the exising file will be overwritten and this option will not have any effect.
- Content Created Bulk Operations: This section is used to apply bulk-operations to all or the selected files listed in the table of input files (#20). Multiple bulk operations are provided that should cover the most common date adjustment needs, e.g., fixed timestamp for all files, spreading them equally between two timestamps, shifting all timestamps by a given offset, adding or correcting timezone information, etc.. Please be aware that operations that perform a relative shift of timestamps (e.g., shifting by an hour) are performed based on the last change applied (or the original date if no change has happened before), so that you can e.g. shift timestamps and afterwards change the timezone without losing your previous adjustment.
Bulk operations will always be applied relative to the last adjustment made to the Content Created timestamp of a photo or video (A)
- Bulk Operation Seelector:
Here you can select from a range of operations by which to change the selected photo files' Content Created timestamps. If you hover the mouse pointer over the little red icon to the right of the selector, you will get some more explanations when to typically use a specific ooperation.
- Bulk Operation Parameters: Depending on the bulk operation you chose, different further parameters may need to be configured, e.g., a reference timestamp to use, or a new timezone.
- Select...: Here you can select all or none of the files in the table below for updating with a bulk operation. Additionally, you can invert the current selection, or you can select all photos or videos of a certain type (e.g. jpg), camera model (e.g. iPhone) or input folder (e.g. when processing sub-folders or selecting several input folders at once) – thus allowing you to e.g. synchronize photos from many parallel sources that may be off time-wise.
Alternatively, you can select files with the checkboxes at the left side of each table row (21) or by left-clicking, shift-left-clicking or control-left-clicking rows directly in the table.
The file selected last will be shown in the Info Panel on the right side. If no file is selected, the Info panel will be empty
- Update Selection: Updates the Content Created timestamp of the selected, unprocessed files (and only those) with the bulk operation you have specified at the Content timestamps area (15).
- Update All: Updates the Content Created timestamp of the all unprocessed files (irrespective of which ones are currently selected) with the bulk operation you have specified at the Content timestamps area (15).
- Undo/Redo: Here you can undo or redo the last bulk operations applied to the input photos and videos – until you save those changes which cannot be undone.
- Input Files Table: All input photos and videos are listed in this table with their key information like filename, relative folder name, Content Created, File Created and File Modified timestamps etc.
- Selector column: Click the checkboxes to select an input file for updating with a bulk operation or to edit the Content Created Timestamp manually.
- Selected file: A selected file gets highlighted and its information displayed in the Info Panel to the right of the window.
- Sequence No: The sequence number determines the sequence in which the input photos or videos get updated with a bulk operation and later saved to the file system. This sequence may influence how e.g. distributing files equally between two timestamps will be applied to individual files. You can influence the sequening criteria with the dropdown menu to the right of this table column header.
- Table Header Dropdown Menu: Here you can control which table columns are displayed or hidden. You can also do so by right-clicking anywhere in the table header.
You can rearrange the table columns by (left-click-)dragging them with the mouse to the location you prefer in the table. You can also resize them by dragging the separator line between two table header cells.
If a table column support sorting, it will show a little chevron icon on the right when hovering the mouse over the respective header cell. Clicking the chevron icon will toggle between sorting the table column ascending or descending.
- Status column: This table column indicates whether a photo or video has been analyzed (grey), adjusted with a change and is hence ready for processing/saving (blue), has been successfully processed/saved already (green), has been processed with a warning (orange) or with an error (red). Hovering over the status icon will bring up an explanatory tooltip.
- File Created: Always adjust to / Adjust toThis column shows the photo file's File Created file system timestamp. With the picker at the table column header you can define how Photo Date Adjustator adjusts the File Created timestamp of a photo file. If you select "Always adjust to", the application will modify this timestamp independent from whether you apply any changes to the Content Created timestamp. If you select "Adjust to", then the File Created timestamp will only be adjusted, if the Content Created one gets modified. In addition to this, you have to specify from the picker to the right to which value you want the File Created timestamp to be adjusted; possible values are: "the current point in time", i.e. the point in time when the file gets processed (you hit the "Save" button (see #42)), "the Content Created timestamp", i.e. the File Created timestamp will get the same value as the photo's Content Created timestamp, or "its current value, i.e. keep as is, if possible", i.e. keep as is, if possible.
The Mac's supported file systems usually have a limit of how far back a file system timestamp can be dated: a common limit is January, 1st, 1970, which originates from the early UNIX file systems (timestamps got stored as seconds since Jan 1st, 1970). When storing files on some Cloud file systems like Microsoft OneDrive or Windows File Systems, you may encounter even later date limits (e.g. )Jan 1st, 1980). Changing file system timestamps to dates earlier than those limits usually fails (depending on file system used) or gets corrected changed arbitrarily when later accessing or copying the file. Photo Date Adjustator will by default clamp all timestamps which would be earlier than those file systems limits to Jan 1st, 1970 (or Jan 1st, 1980 respectively). You can modify this behaviour in the application's Settings section.
- File Modified: Always adjust to / Adjust toSame as File Created: Adjust to (see #27), but for the file system timeatamp File Modified.
- Action column: For each photo file, an action can be defined (or will be defined by a bulk operation). Possible actions are: "Do not change" meaning the currently stored value is not modified; "Reset" in order to reset the currently stored value after modification to its original value when the input file was read, "Set" to set the Content Created timestamp to the specified value, "Delete" to entirely remove the Content Created timestamp from the photo file's metadata, and finally "Lock" to block this file from any further changes (e.g., bulk operations ignore this file).
- S(tored): The S icon indicates that the timestamp to the right is the timestamp which is currently stored in the respective file's metadata. Initially, it is the timestamp extracted from a photo's or video's metadata or the File Created/Modified timestamps as read from the input file. Once you have modified and processed the file, this value represents the newly stored value. If adjusting the metadata was successful, the S icon will have a green background to indicate successful adaptation. If an error occured or the value does not exactly match the value to be expected, the background will be red and if you hover over the icon, an explanation will pop up.
- A(djusted): The A icon indicates that the timestamp to the right is an adjusted timestamp – it will be the new timestamp when processing, i.e. saving, the respective file. Adjustments can take place by using a bulk operation (see #14) or by manual editing (see #32).
Once you process/save a file, this value will turn into the new stored value (see #29).
The semantics of S (#29) and A (#30) have slightly changed between v4.00 (and above) and the version below, where the two values represented "Before" and "After" processing values. This was necessary as now several adjustments and multiple processing steps take place without reloading.
- Content Created Indicator: This icon indicates how the Content Created timestamp to the right has been determined: If it is a red cross icon, there was apparently no timestamp data contained in the photo's or video's metadata and hence a fallback timestamp (if defined in (13)) is taken by default. If an 'i' icon is shown, partly filled in red, orange or green, this indicates that a Content Created timestamp was retrieved from the respective photo or video file. If you hover the mouse over the icon, an explanatory tooltip will provide in-depth explanation which metadata properties were used to derive the most accurate timestamp info for the photo.
- Content Created Picker: If one or more photo or video files are selected, which shows them as highlighted rows in the table of input files, you can edit their Content Created timestamp individually in this picker/editor. All selected files will be set to the same adjusted timestamp based on your input.
- File Created Indicator: As explained above in (see #12), this indicator icon tells you what option was used to derive this 'adjusted' File Created timestamp (current value, Content Created timestamp or time of processing/saving).
- File Modified Indicator: As explained above in (see #12), this indicator icon tells you what option was used to derive this 'aadjusted' File Modified timestamp (current value, Content Created timestamp or time of processing/saving).
- Info panel: The Info Panel provides an overview of a selected photo's or file's metadata properties. You can resize the Info Panel by dragging the vertical divider line to the table, or by dragging the horizontal divider line between the photo's preview image and the File infos section below.
- Info panel menu: Opens a menu from which you can pick certain actions like opening the photo in preview or show the file in Finder, or customize which info sections are displayed in the Info Panel.
- Preview image: Hover over the image to reveal the 'head-up display' functions, like zooming in and out or toggling between 'zoom to fit' and 'zoom to original size'. You can also zoom in an out by pressing the Command(⌘) key while swiping up and down on the mouse. Swiping without the Command(⌘) key pressed will pan the window into the direction of the swipe as usual.
- Adjusted Content Creation picker: Shows the photos or videos adjusted Content Created timestamp. You may manually edit the timestamp here, as well as in the table row itself. When editing here, only the corresponding photos Content Creation timestamp will be changed (editing in the table will adjust the changed timestamp component for all selected photos/videos). You can use undo/redo to correct any accidential changes.
- Metadata filter: Here you can provide filter criteria by which you can narrow down the list of metadata attributes displayed. You can distinguish between specific metadata group names, subgroup names or property names – depending on which property display option you have chosen (see #40).
- Medadata menu: Opens a menu from which you can chose whether metadata should be displayed in groups or "flat", whether subgroup names should be displayed, too, and whether you want only those properties to be displayed that have changed after processing. The latter option allows for quickly identifying if all metadata modifications have been performed as expected.
- Metadata properties: A grouped list of all metadata attributes retrieved from the photo or video is displayed here.
With the context menu next to the filter field (see #40), you can configure whether you want properties to be displayed combined in their respective groups (e.g., EXIF or Makernotes), have subgroups indicated, or whether you want to show attributes simply as a flat, alphabetically sorted list.
You can also filter those attributes (case-insensitive) listed by using the Filter field above the metadata attributes. Matching text will be highlighted.
You can drag & drop the metadata properties to your Mac's Desktop or into a Finder window or email – all currently displayed metadata properties will be exported as a CSV (Comma-Separated Values) file which you can, .e.g., open with Apple Numbers or Microsoft Excel. You can specify the separator symbol (comma or semicolon) in the Settings section.
Besides dragging & dropping, you can right-click in the metadata properties section and copy all properties to the clipboard for pasting into any text editing tool.
- Processing Toolbar: At the bottom of the window you'll find the Processing Toolbar. It contains information and actions related to the processing of the input files after having adjusted them to your needs above. All changes you apply to the photos and videos in Photo Date Adjustator are transient unless you save those changes back to the input files – or their copies respectively.
- Processing Progress Indicator: This progress indicator helps you getting at a glance how many of your files have been analyze (grey), adjusted and are ready for processing (blue), have been succcessfully processed/saved already (green), were processed/saved with warnings (orange) or whose processing failed with an error (red). You can hover over each colored bad to get an explanatory tooltip.
- Save ... changes: Once you have any files with pending changes, i.e. files with adjustments to Content Created, File Created or Modified Created not been processed/save yet, this button will be enabled and tell how many files are up for processing. Once you press the button, those files will be processed/saved. You may cancel any running processing by pressing the 'Stop' button that will be displayed during the procedure. You can at any later time simply continue processing unprocessed files by pressing 'Save ... changes' again.