Getting you started quickly
This section will give you a quick overview over Photo Naminator's user interface and how to get you going with renaming your photo files.
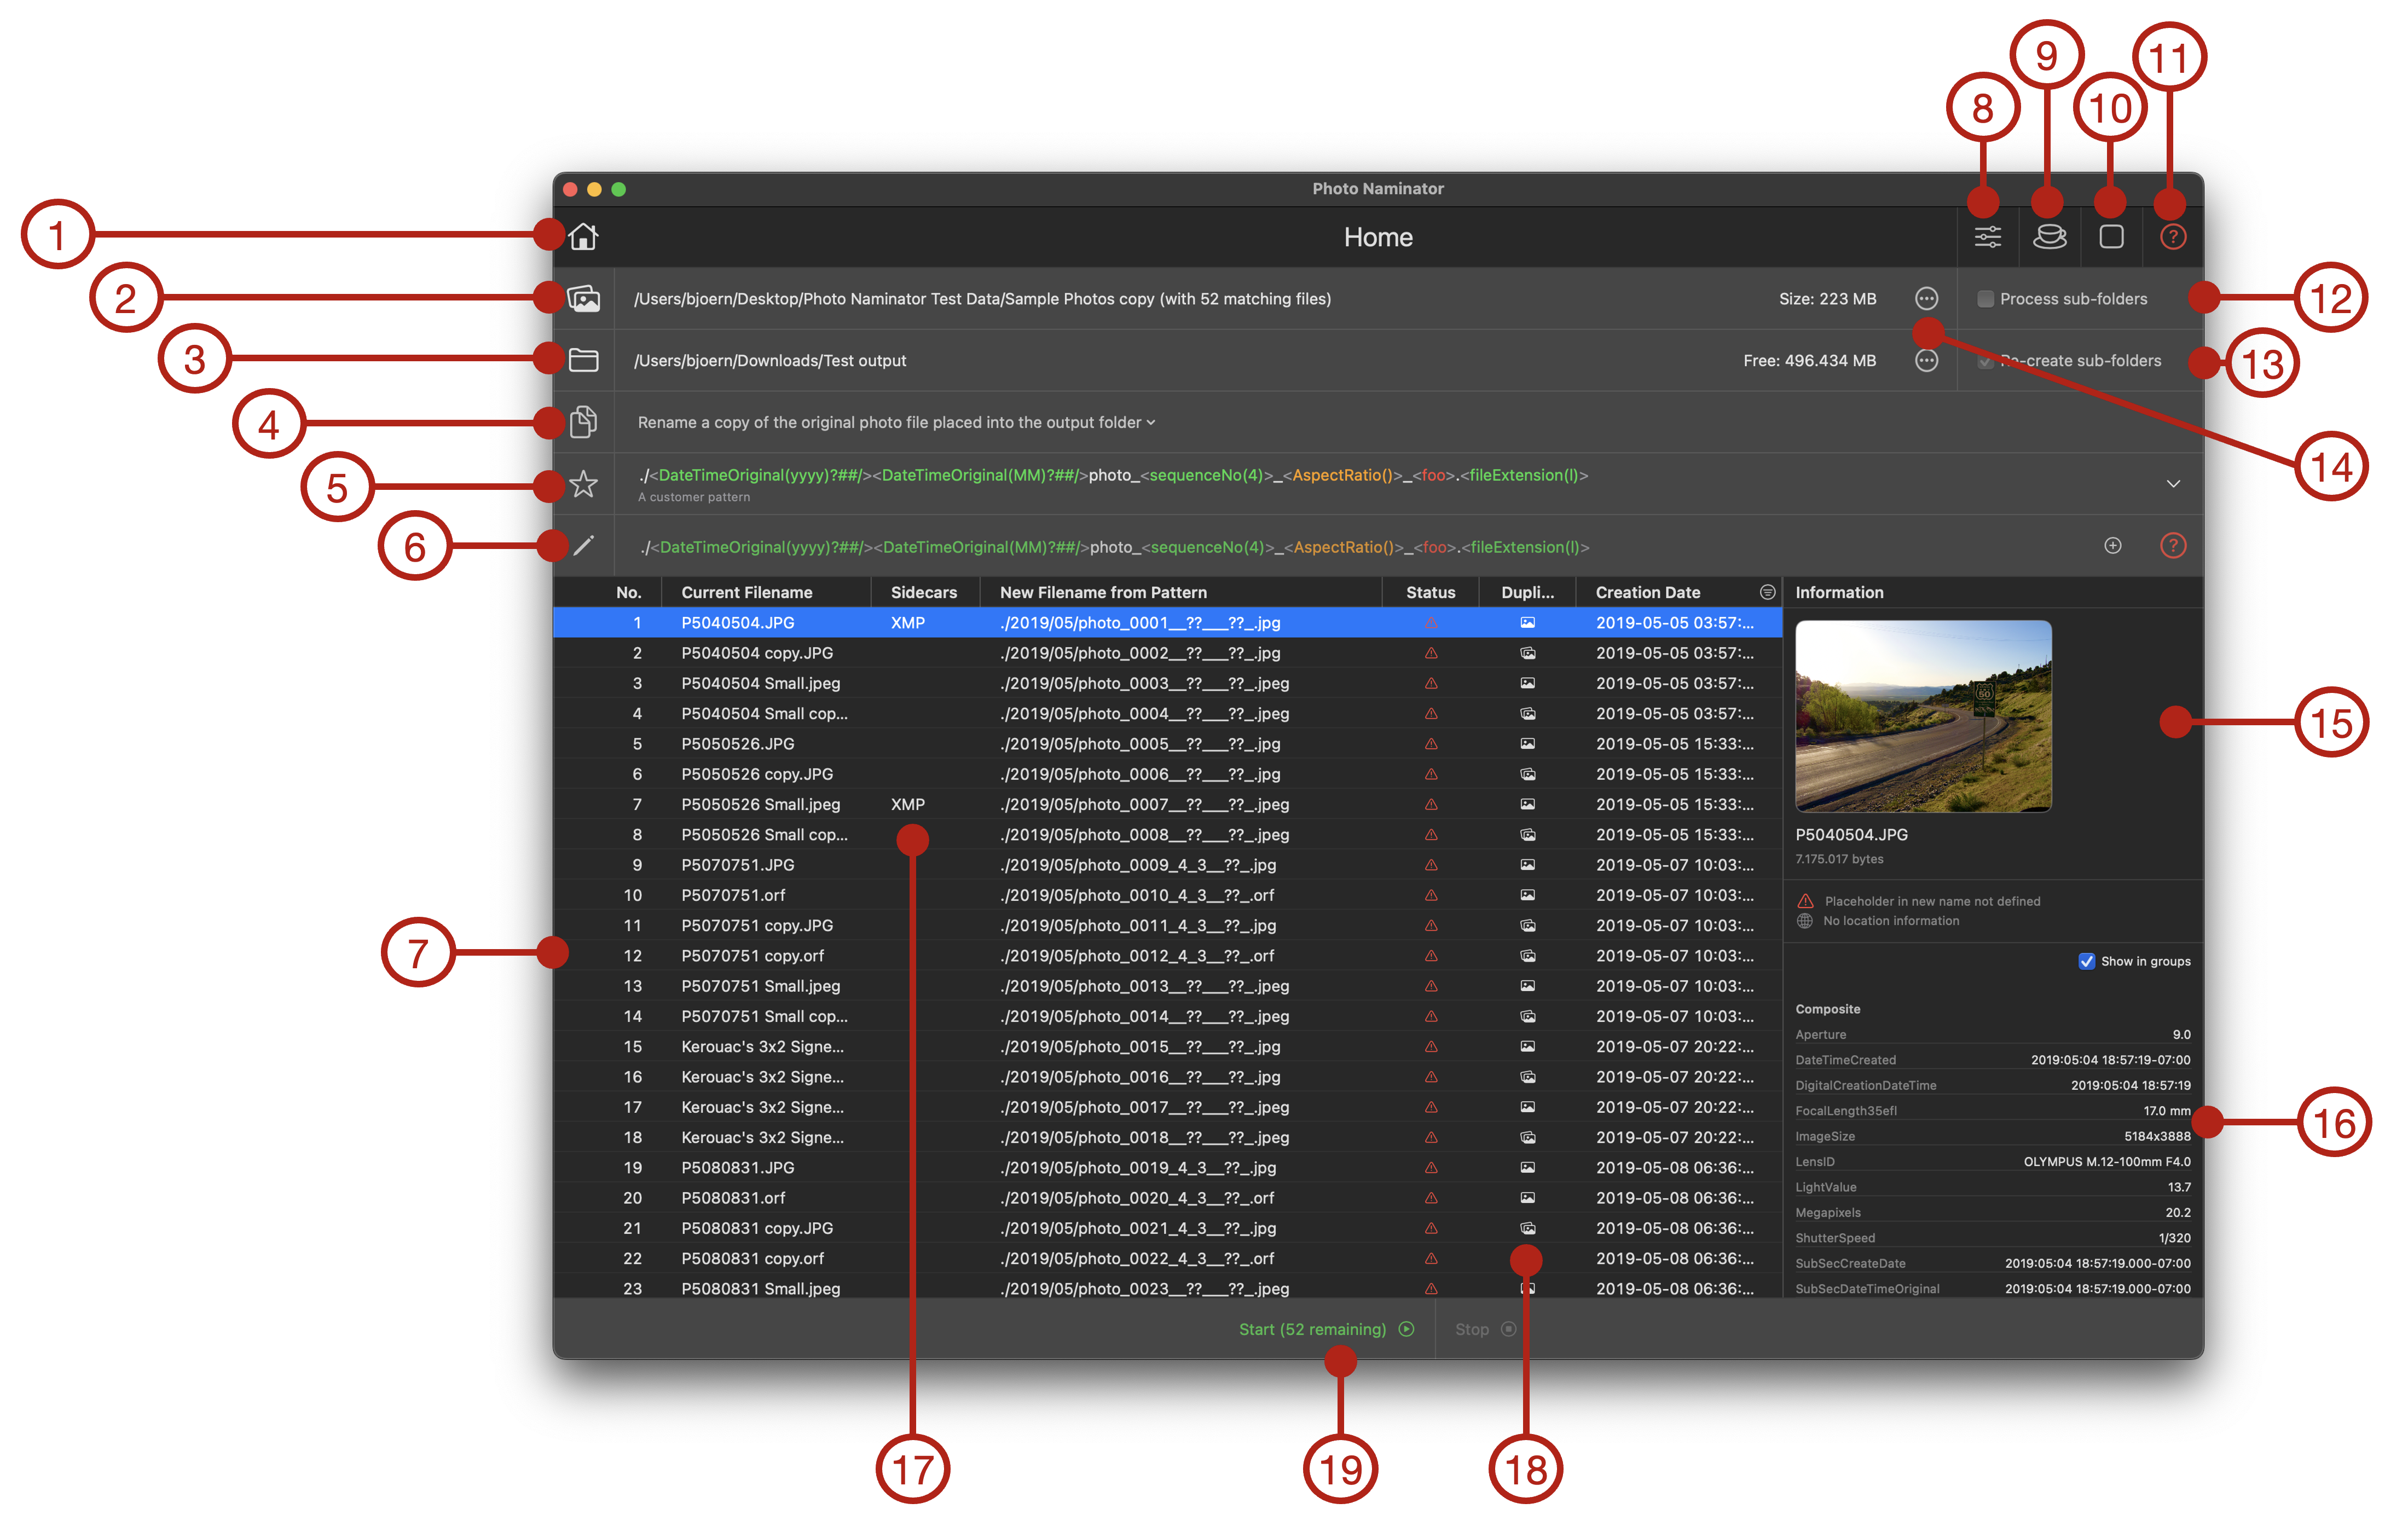
- Home button: The home button on the navigation bar of Photo Naminator gets you to the main or home sheet. Here you can select which photo files ou want to process, where to put the renamed files in your file system, how to rename each file based on a name pattern and you can browse through all the files you have selected.
- Input Files/Folders: First step is always to select a folder or individual files within a folder that you want to use as input to the renaming procedure. You can either click this button or you can drag & drop files or folders here from Finder or your Mac's desktop. Once you have made your selection here, Photo Naminator will start scanning all files – and if recursive processing of folders is enabled in the settings of Photo Naminator also the sub-folders within the folder you provided as input –, read their metadata and once finished list all photo files found in the table below (7). It's important to note that Photo Naminator will process/rename each input file at most once, i.e. if a file has been successfully renamed it will not be processed again even if you press "Start" a second time. If you want to re-process a file, you have to re-select it as input to Photo Naminator first and hence start over. Caveat: If you want to process several hundred or thousands of input files, please read Sandboxing and Processing Many Files first!
- Output Folder: Second step is always to provide an output folder where Photo Naminator will move or copy the renamed photo files. You may select the same folder as the input folder here, which means the renaming may occur 'in-place' with the original file.
- Copy, Move, Alias or Hard Link?: By default, Photo Naminator will always create a renamed copy of your original files in the output folder and hence leave your original photo files unmodified. Alternatively, Photo Naminator can also rename the original file and move it into the output folder. As of v1.36 you can alterntively create an alias with the new name in the output folder that points to the original input photo file which is untouched (this is equivalent to selecting the original photo file in Finder by right-clicking, selecting "Make Alias" in the context menu and renaming the alias file). Last but not least, also as of v1.36, there's the option to create a so-called 'hard link' in the file system where the hard link gets the new name while the original input file remains untouched; both the original photo file as well as the hard link represent the exact same, identical file in the file system: both appear to be an image file in the finder with exactly the same properties, the photo's data though is only stored once on your disk. If you want to learn more about (UNIX) hard links, check out the Internet – there is plenty of information available.
There's one exception though due to Apple's sandboxing security features to which Photo Naminator as an App Store-distributed application has to comply: If you selected individual files – and not a folder (and implicitely all of its photo files contained) – as input to Photo Naminator, it is not possible to rename those files and move them to the output folder due to those security constraints. Photo Naminator can only create a copy of the explicitely provided input files (or an alias or a hard link). If you provide the folder in which your input files are located as output folder though, you can rename those files 'in-place' within their current folder. Confused? Yeah, it's not obvious, but a result of application sandboxing.
- Name Pattern Picker: Once you have selected input files/folders and output folder, you will be able to pick a name pattern from the list of pre-defined name patterns coming with Photo Naminator or custom patterns you have defined yourself previously. Just hover the mouse pointer over this field for a second and it will open a menu of name patterns to pick from.
You can rearrange the sequence of patterns by dragging (and dropping) the respective pattern favorite row with the little "hamburger" icon at the right end up and down until you have it at the location you want it. Furthermore, you can customize the auto-hide feature for the Favorite section in Photo Naminator's Settings section: you can hide the explanatory text to make better use of the screen real estate and you can enable/disable the auto-hide feature. If auto-hide is disabled, you can manually re-size the height of the Favorite section as you like.
- Custom Name Pattern: If you don't want to use one of the pre-defined name patterns but create your own one, just click into this field and start typing. There's more information on how a custom name pattern looks like in the Defining Names section.
The name pattern is color-formatted: literal text will be displayed in the primary color (=white or black depending on dark/light mode), placeholder names will be colored to indicate the following:
- Green: the placeholder is valid and it is defined for all input files
- Orange: the placeholder is valid, but it is defined for only a subset of the input files
- Red: the placeholder is not valid or it does not apply to a single input file
- Photo Files Table: Once the scanning of the input files/folders is completed, you'll get the complete list of input files presented as a table through which you can scroll. The table can be sorted by columns (simply click a table column title to sort ascending or descending), can be filtered by content, and columns can be resized and re-ordered.
Hovering over a value: Hovering the mouse pointer over a value in the 'Current Name' column will bring up a tooltip displaying the file path of the respective file, hovering the mouse pointer over the "New Filename from Pattern" value shows a tooltip with the target file path when the currently selected and/or edited name pattern is applied to this file.
Selecting a line: If you select a line in the table, the respective photo gets displayed in the info pane to the right (10) as well as the list of all EXIF and TIFF metadata attributes and their values are listed (9).
As you modify the name pattern by picking a different predefined one or by typing and changing a custom name pattern in the Custom Name Pattern field (6), the "New Name from Pattern" column will automatically reflect the impact on a photo file's new derived filename.
- Settings button: The Settings button on the navigation bar opens the Settings sheet. There you can customize some of the behavior of Photo Naminator. See Settings for more details on settings.
- Donation button: The Donation button on the navigation bar gets you to Donation section of Photo Naminator. Here you can make a small voluntary donation to the author's coffee addiction via the Apple App Store – if you like.
- About button: The About button on the navigation bar gets you to the About section of Photo Naminator providing useful links to support and documentation, as well as the latest release notes and information about newer versions available.
- Help button: The help button on the navigation bar gets you to this documentation on Photo Naminator's support website.
- Process sub-folders: If this option is selected, Photo Naminator will recursively process the input folder as well as all its sub-folders (and those within). If this option is disabled, only the files in the currently selected folder will be processed.
- Re-create sub-folders: If you select this option and have Process sub-folders enabled as well, Photo Naminator will re-create the sub-folders found in the input folder in the exact same structure within the output folder. This allows you to convert files stored in arbitrary sub-folder structures and maintaining this structure while renaming individual files. If this option is disabled, Photo Naminator will move or copy the input files 'flat' into the output folder. If you create folders in the renaming process thru the name pattern, those folders will either be placed directly into the output folder (this option disabled) or within each respective folder re-created from the input folder (this option enabled). Confused?
- Input File and Output Folder menus: Click the litte circled "..." icon to show a context menu for the input file selection or output folder selection. The menu also allows you to quickly navigate to prior selection, refresh the current selection, open the files/folder in Finder, or manage access permissions.
- Photo: If you select a row in the table of photo files (7), the respective photo will be displayed in the Info Pane. Double-clicking the photo will open the default application associated with this media type (e.g. Apple's Preview app or a photo application).
- Photo Metadata Attributes: If you select a row in the table of photo files, the photo's metadata attributes will be displayed with their values. All the attributes can be referenced by placeholders in your custom name pattern and will be filled with the values displayed here for each individual photo file. You can group the attributes into their respective metadata groups (e.g. EXIF, File, ICC, ...).
- Sidecar info: This table column shows the extensions of any sidecar or companion file that Photo Naminator associated with the respective photo or video file. Sidecar files are e.g. XMP files, files that contain additional metadata from, for example, image processing software outlining processing steps applied. These sidecar files are only losely associated with the respective media file by their filename: they have the same base-filename as their "master" file, but have a different file extension (e.g. XMP instead of PNG). Photo Naminator automatically associates sidecar files based on this rule. This column shows whether any sidecar files were detected for a specific input file and it shows what type/extension it is. When renaming a photo file, Photo Naminator will automatically rename any sidecar files, too, and thus keep the relation between "master" and "sidecar" intact.
- Duplicate info: If Photo Naminator detects that two input files are byte-wise identitical, it will mark them as duplicates. This table column indicates whether the file is unique (= icon with one picture) or a duplicate of another file (= icon with a deck of pictures). Hovering over the icon will reveal additional information.
- Start (n files remaining): Once you have selected input and output files/folders and selected a name pattern, you can hit the 'Start' button to trigger a renaming run. The button's text will tell you how many files remain to be renamed from the entire set of photo files scanned from the input folder(s) you provided.
It is important to note that Photo Naminator will process each photo file at most once! The photo file table displays the status of each photo file in the 'Status' column. If a file can't be accessed for renaming, if a placeholder is missing and you've set the option to only rename files with fully qualified placeholders in the name pattern, if you run out of disk space for copying the renamed files during processing – all these can keep Photo Naminator from processing a photo file. You can then change the name pattern, make some additional space available on your filesystem or uncheck the respective options in the Settings, and press 'Start' again to try to re-process those photo files that haven't passed successfully in the previous run. Once all files have been processed and there are no more remaining files, the 'Start' button will be disabled. If you want to start over again, simply set an input folder or input files again (see 2).