This section will give you a quick overview over Photo Anonymizator's user interface and how to get you going with anonymizing your photo files.
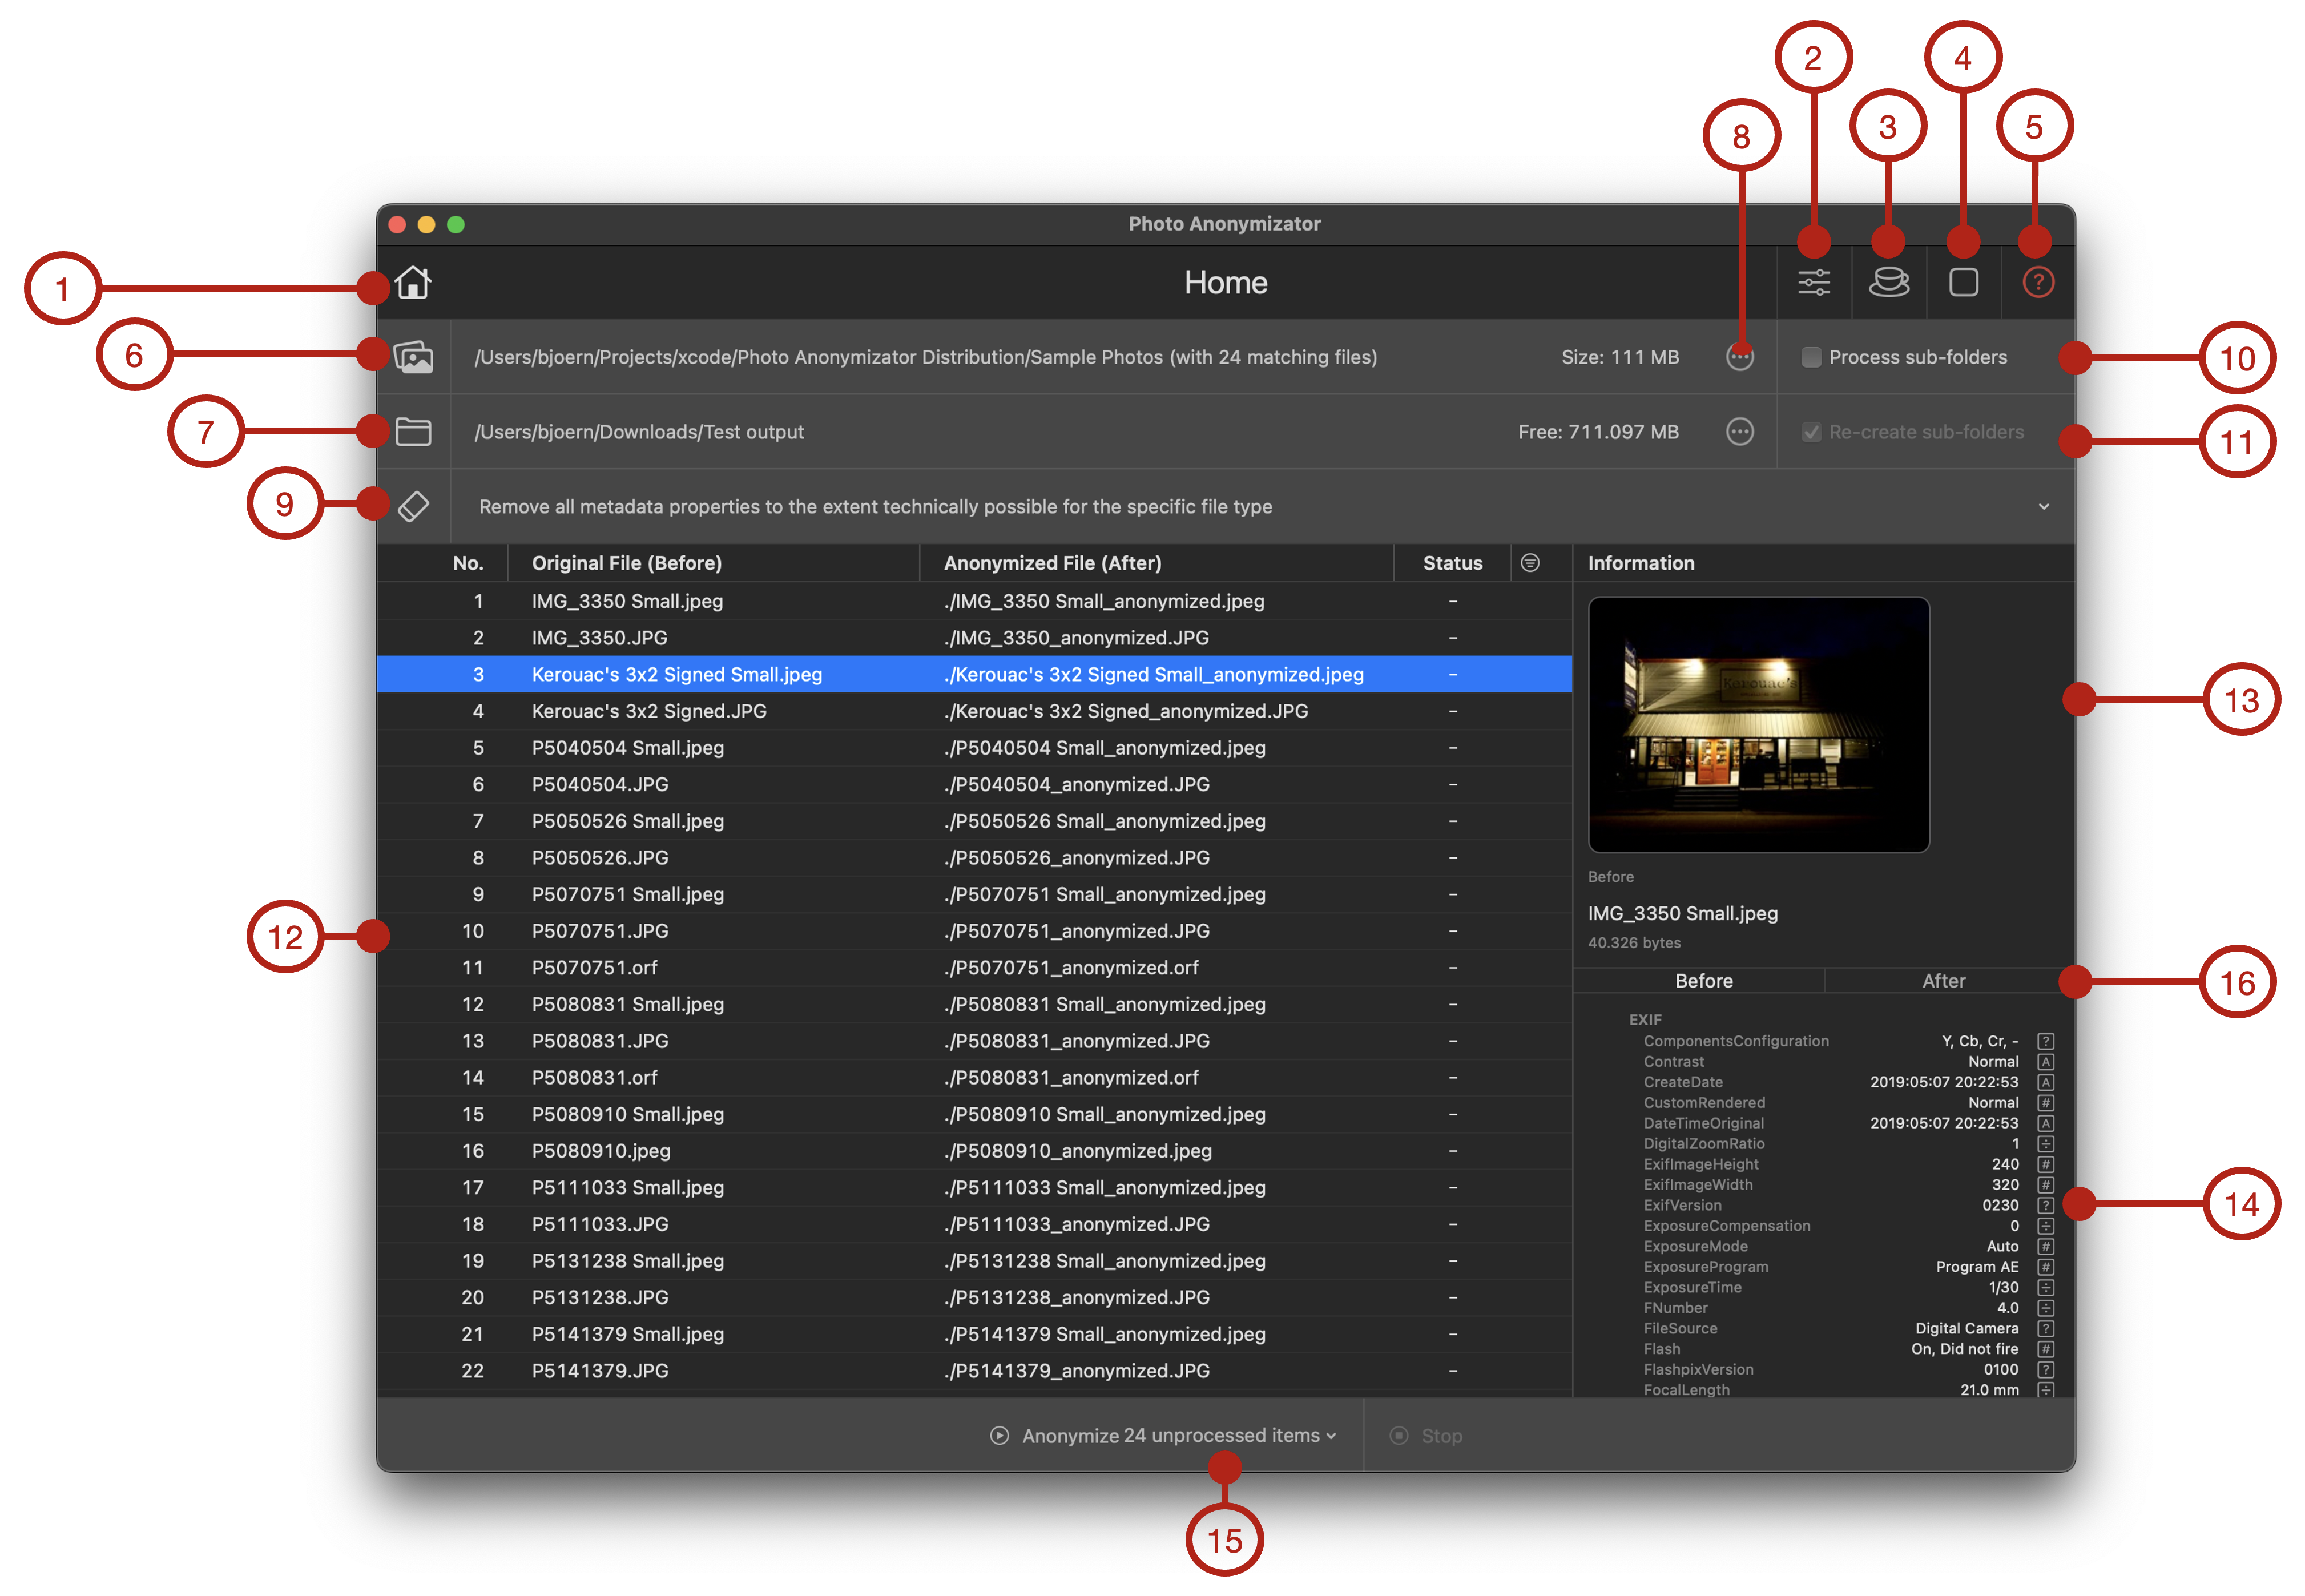
- Home button: The home button on the navigation bar of Photo Anonymizator gets you to the main or home sheet. Here you can select which photo files ou want to process, where to put the renamed files in your file system, how to rename each file based on a name pattern and you can browse through all the files you have selected.
- Settings button The Settings button on the navigation bar opens the Settings sheet. There you can customize some of the behavior of Photo Anonymizator. See Settings for more details on settings.
- Coffee Donation button: Gets you to the Coffee Donation section where you make a coffee donation to the author of Photo Anonymizator in case you like the app and feel about supporting the development and maintenance of it. No worries – all just a voluntary, one time donation of course.
- About button The About button brings up the About section. It contains version information, release notes and convenient access to getting support from the author of the app.
- Help button: The help button on the navigation bar gets you to this documentation on Photo Anonymizator's support website.
- Input Files/Folders: First step is always to select a folder or individual files within a folder that you want to anonymize/remove their metadata. You can either click this button or you can drag & drop files or folders here from Finder or your Mac's desktop. Once you have made your selection here, Photo Anonymizator will start scanning all files – and if recursive processing of folders is enabled in the configuration of Photo Anonymizator also the sub-folders within the folder you provided as input –, and once finished list all photo files found in the table below (12).
Hint: It's important to note that Photo Anonymizator will process each input file at most once, i.e. if a file has been successfully anonymized it will not be processed again even if you press "Anonymize" a second time. If you want to re-process a file, you have to re-select it as input to Photo Anonymizator first and hence start over. Caveat: If you want to process several hundred or thousands of input files, please read Sandboxing and Processing Many Files first!
- Output Folder: Second step is always to provide an output folder where Photo Anonymizator will copy the anonymized photo files. You may select the same folder as the input folder here, which means the anonymizing may occur 'in-place' within the original input folder. If no folder is selected and you select an input folder (6), that same folder will automatically be set as output folder. If an output folder is already defined, it will not be changed.

- Input folder/Output folder drop-down menu: This menu contains items to select, deselect, refresh, re-select recent prior selections or manage the input and output folder configuration as needed.
- Removal Mode: Here you define whether you want all metadata attributes removed (some fundamental attributes will be preserved as to not render the photo format useless), or all metadata attributes except color profile and basic EXIF information (like photo orientation), or whether you want to select individual attributes for removal.
Hint: Depending on the specific format of a photo file not all metadata attributes may be removable/deletable. This applies in particular to RAW format files which are camera/vendor specific formats. If the anonymization of a photo file cannot be flawlessly completed, the file will be marked with a warning or error message and be presented with a red flag in the photo file table. By hovering over the red status symbol or by selecting the respective line in the table, the warning or error message will be displayed and provide further information.
- Process sub-folders checkbox: If selected, Photo Anonymizator will not only scan the folder you set as input folder, but also scan all its sub-folders for matching image files.
- Re-create sub-folders checkbox: If selected, and if the 'Process sub-folders' option is enabled, Photo Anonymizator will re-create the sub-folder structure found in the input folder also in the output folder, and place all anonymized output files into their respective output sub-folder, i.e. a file found in sub-folder.
- Photo Files Table: Once the scanning of the input files/folders is completed, you'll get the complete list of input files presented as a table through which you can scroll. The table can be sorted by columns (simply click a table column title to sort ascending or descending), can be filtered by content, and columns can be resized and re-ordered.
Hovering over a value: Hovering the mouse pointer over a value in the 'Filename' column will bring up a tooltip displaying the file path of the respective file.
Selecting a line: If you select a line in the table, the respective photo gets displayed in the info pane to the right (13) as well as the list of all metadata attributes and their values are listed (14).
- Photo: If you select a row in the table of photo files (7), the respective photo will be displayed in the Info Pane. Double-clicking the photo will open the default application associated with this media type (e.g. Apple's Preview app or a photo application).
- Photo Metadata Attributes: If you select a row in the table of photo files (7), all the metadata attributes will be displayed with their respective values. If the attribute can be removed, a slightly visible eraser or redacting icon is shown to the left of the attribute name. If the attribute is actually marked as relevant for anonymization (removel), the icon is shown distinctly. By clicking on an individual attribute line you can mark or unmark the attribute and thus add or remove it from the set of anonymization attributes. Once a file has been successfully anonymized, you'll find the resulting attributes still stored within the output version of the file by clicking the 'After' between the photo displayed and the attributes list. You may want to check whether all attributes with an eraser icon have disappeared and those with a redacting icon have been overwritten properly.
Hint: Please be also aware that not all metadata attributes of a photo can be erased or overwritten: they may be required to properly render the picture (e.g. image dimensions, orientation, color profiles, etc.).
And another hint: Photo Anonymizator is called Photo Anonymizator as – by default – it comes configured to remove those metadata attributes which may be considered privacy-relevant and sensitive, e.g. timestamps when a photo taken or where it was taken (GPS coordinates), comments, creator names, etc.. The default settings (or when resetting the settings in the Settings section) has been pre-selecting all relevant metadata attributes for removal (at least to my best knowledge). Feel free to add or remove what you deem necessary.
- Anonymize [All | #n unprocessed items): Once you have selected input and output files/folders, you can hit the 'Anonymize' button to trigger removal of metadata from those photo files. There are two modes of operation for this button which you can select from the drop-down menu:
- Anonymize All: Whenever you press the button, all photo files will be (re-)processed independent of their previous processing status. You may end up with already processed files being re-processed, which will result in additional copies of the same file showing up in the output folder (getting a sequence number as name suffix to avoid overwriting of existing files).
- Anonymize #n unprocessed items: Whenever you press the Anonymize button, Photo Anonymizator will attempt to anonymize exactly those photo files that have not been successfully processed (and copied to the output folder) before. This mode is useful if you need to re-run anonymization with slightly altered settings and don't want to double-process files that have already been successfully processed.
The button's text will tell you how many files remain to be processed from the entire set of photo files scanned from the input folder(s) you provided.
Hint: The photo file table displays the status of each photo file in the 'Status' column. If a file can't be anonymized or if you run out of disk space for copying the anonymized files during processing, it will be marked with a red alert symbol at the specific photo file's row. You can then try to fix the cause of the issue (like making some additional space available on your filesystem) and press 'Anonymize' again to try to re-process those photo files that haven't passed successfully in the previous run. Once all files have been processed and there are no more remaining files, the 'Anonymize' button will be disabled. If you want to start over again, simply set an input folder or input files again or refresh the input selection by selecting 'Refresh' in the input folder's drop-down menu. (see 8).
- Before / After: Clicking 'Before' or 'After' allows you to switch between a photo file's metadata attributes before the anonymization, and after the processing. Please check if all metadata attributes have been removed as expected. If not, try alternative removal settings (see 9).